With the exception of the VoiceLink I, which has a single channel, each classroom audio system has two frequencies so that two microphones can be used simultaneously.
A classroom Sound Field System is essentially a small public address (PA) sound system, designed for the confines of a typical classroom–approximately 1000 sq ft. These systems are engineered to maximize intelligibility of the educator’s voice as well as all audio sources connected through it such as TVs, touch boards, projectors, and computers.
Sound Field vs. Sound Amplification/Reinforcement:
From a hardware standpoint, these systems are similar and therefore often confused as being equal. Both require an amplifier, receiver (for audio inputs), and overhead speakers (ceiling or wall mount). However, classroom Sound Field systems are different in two important ways:
How loud does audio need to be?
More than 50 studies have been conducted on classroom sound to establish that at least 65 decibels are needed for a student to hear well. This is because the normal noise level in a classroom is about 50 dB and the studies concluded that a signal-to-noise ratio of 15 dB is needed. Translation: the teacher’s voice and all audio sources need to be 15 dB louder than other environmental sounds in the classroom: 50 + 15 = 65 dB. It’s important to note that the 65 dB level is at the students ears, not from the source, e.g. the teacher’s mouth.
So why a microphone for teachers?
Normal speech is 50-60 dB. Loud speech (using your teacher’s voice”) is about 65 dB. Good right? Wrong. Due to basic physics, after about 12 ft this has decreased to 53 dB. The average air conditioner runs at 50 dB, which means even if the teacher’s voice is 53 dB at 12 ft, it’s only 3 dB higher, not the 15 dB the studies have shown are needed. And any student sitting beyond 12 ft is struggling to comprehend what’s being said.
It’s not just about volume. It is about the consonants.
Often teachers will try to compensate throughout the day by projecting. The main job of a Sound Field system is to evenly distribute high frequency (soft consonant) sounds throughout the room. However, speaking lower pushes the vowel sounds up. Students may hear more, but understand less. The microphone is simply sending the teacher’s voice through the Sound Field system so that it is reproduced for every student as if the teacher is just a couple feet away. It also maintains the crucial soft consonant sounds required for student comprehension.
Everyone.
A classroom sound field system will evenly distribute the teacher’s voice throughout the classroom so that every student can hear all the components of speech as accurately as possible. A loud voice does not mean that consonants are louder. It is impossible for a person to make consonants louder and consonants are key to speech intelligibility. An audio system amplifies the parts of speech that give intelligibility and make it easier for students to understand and concentrate on what the teacher is saying. Learn more about about Sound Field by clicking here.
Many studies can be downloaded from our website under Research Studies.
TeachLogic is a professional audio manufacturer specializing in infrared products, classroom sound-field systems. Today, TeachLogic has established a leadership position in the wireless infrared sound-field industry. Our products are designed to deliver optimum speech intelligibility-providing crystal-clear sound to students regardless of the listening environment.
TeachLogic has provided high-quality Sound Field systems since 1994.
Not all classroom audio companies are the same. TeachLogic’s reputation is to listen to our customers and respond to their needs to the best of our abilities. To design and manufacture innovation, quality, products at fair and reasonable prices. To operate our business with integrity towards our customers and our employees. TeachLogic has established a nationwide network of top integrators to provide immediate customer product knowledge, sales, service and support. In addition, with TeachLogic’s dedicated commitment to customer satisfaction, TeachLogic is the ideal choice for your audio needs.
RF (radio frequency) technology uses radio waves to transmit the audio signal. These are susceptible to RF interference. IR (infrared) technology used infrared light to carry the audio signal thus keeping the signal in the room and eliminating RF interference.
With RF technology, there is a limit depending on local interference and the number of systems desired. With IR technology, as long as the classrooms are enclosed, there is no limit to the number of systems you can have on one campus.
No. Large open-air spaces overwhelm the IR signal. The reflective nature of this technology is ideal for standard classroom audio.
Sometimes a single system is used to support two rooms. However, at times it may be desirable that the speakers in the second room are switched off so the sound does not play in that room. The best way to accomplish this would be with a 3rd party speaker switch such as the one seen here. It is wired inline between the TeachLogic amplifier and the speakers.
[printfriendly]
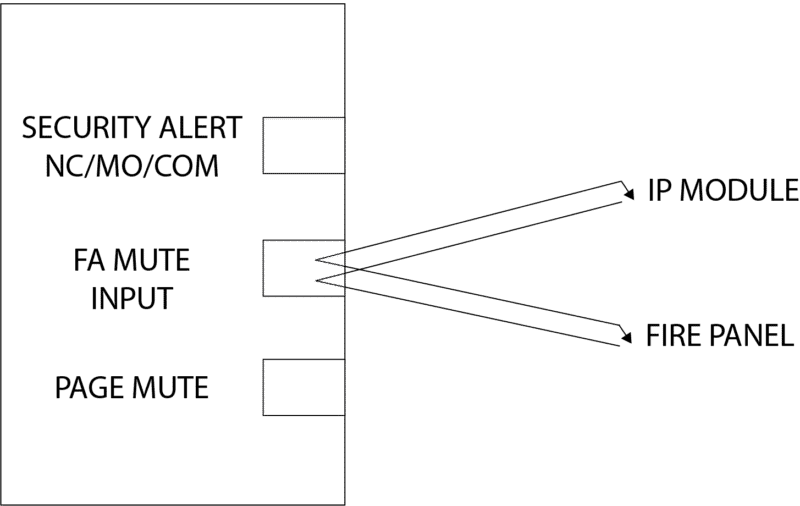
Summary: For integrators comfortable doing so, you may connect both the fire alarm relay and an intercom/paging IP module relay to the FA Mute Input. The input is a dry contact closure in the normally open position. The amplifier looks for this circuit to close. Any “short” or “closure” of the circuit will mute the amplifier.
Compatibility: TeachLogic Maxim™ and Spectrum™ amplifiers
Disclaimer: We recommend consulting both the fire and paging system specs and instructions to ensure compatibility. We cannot guarantee function, so we recommend repeated testing. Also, we cannot advise whether this will void the other systems’ warranty, service agreement, or another binding document.
Integration: Wire the fire alarm and IP module in series/parallel. This allows either/both to close the circuit.

Download a copy of this document:
In most cases, yes. Each system is complete with everything needed to install and operate the system. The type of speaker choice will determine the difficulty in installation. TeachLogic has established a nationwide network of top integrators to provide immediate customer product knowledge, sales, service and installation of systems. TeachLogic’s service department is available to answer any questions regarding the installation.
TeachLogic’s service department is available to answer any questions regarding the re-installation. Depending on your location, we have a list of certified installers that may be available to move your system to a different room.
[printfriendly]
“TL” button indicator lights:
No Light: Power is OFF
Solid Blue: Power is ON; 50-100% of battery life
Solid Purple: 25-50% of battery life
Solid Red when using: 0-25% battery life
Blinking Blue: Mic is muted
Solid Red when charging: Charging in progress
Solid Green when charging: Battery is fully charged
Blinking Red: Battery needs to be replaced
Yellow: Mic has entered “test mode”; need to remove battery and reconnect it
[printfriendly]
This is how to use two microphones in a large/split room where each side has it’s own amplifier w/ ceiling sensor. This will avoid each room broadcasting the other’s transmission.
WHEN USING THE IRT-60 SAPPHIRE PENDANT MICROPHONE IN EACH ROOM
Step 1: Designate one room for Channel A (room A), and one for Channel B (room B)
Step 2: In room B, change the channel on the IRT-60 Sapphire microphone from A to B. Watch this quick video to see how: https://www.youtube.com/watch?v=01TKGX1ByZo.
Note that the back cover is sometimes difficult to remove.
Step 3: On the opposite channel in each room, turn the mic channel gain all the way down.
WHEN USING THE IRH-35 HANDHELD MICROPHONE IN EACH ROOM
If using an IRH-35 handheld microphone, please note that it comes set on channel B. Therefore, you’ll need to change the other microphone to channel A (for room A).
Step 1: Unscrew the handle
Step 2: Remove the batteries and locate the channel selector.
Step 3: Change the mic for room A to channel A.
Advisory: If you are using both the IRT-60 and IRH-35 in each room, only one mic can be used at a time to avoid interference. Therefore if the handheld microphone is used, the Sapphire will need to be muted and vice versa.
[printfriendly]
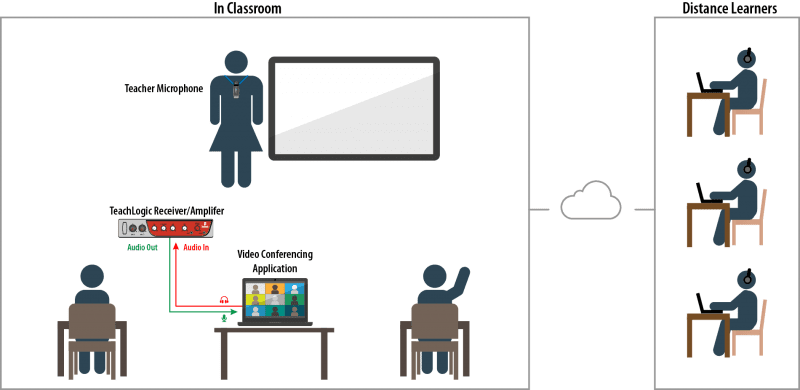
Yes! These are the instructions to connect an already installed TeachLogic classroom audio system to a computer hosting a video conferencing application to synchronize classroom audio for online listeners. Using a TeachLogic wireless microphone allows the teacher to move freely around the room without affecting audio quality for the students.
All media devices connected to the TeachLogic amplifier (including microphones) will be heard by online viewers.
All audio—including devices connected directly to the computer—will play through the TeachLogic amplifier/receiver in the classroom.
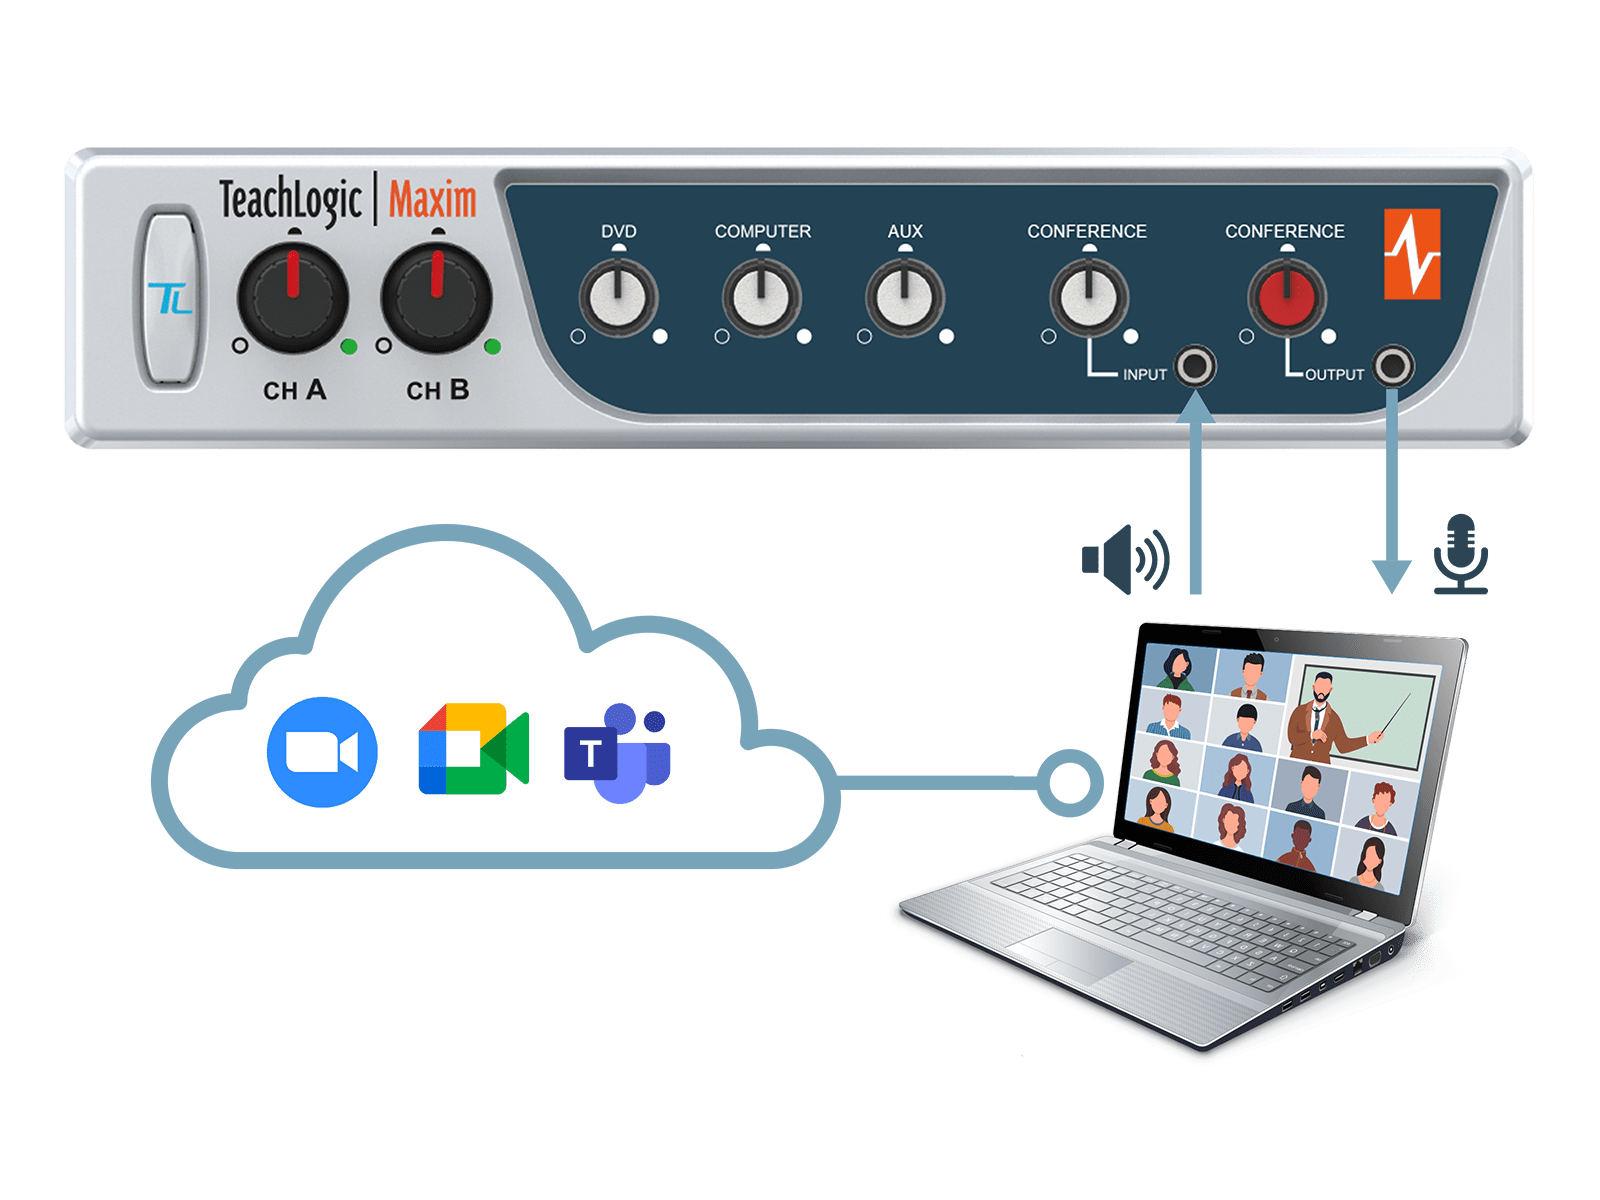
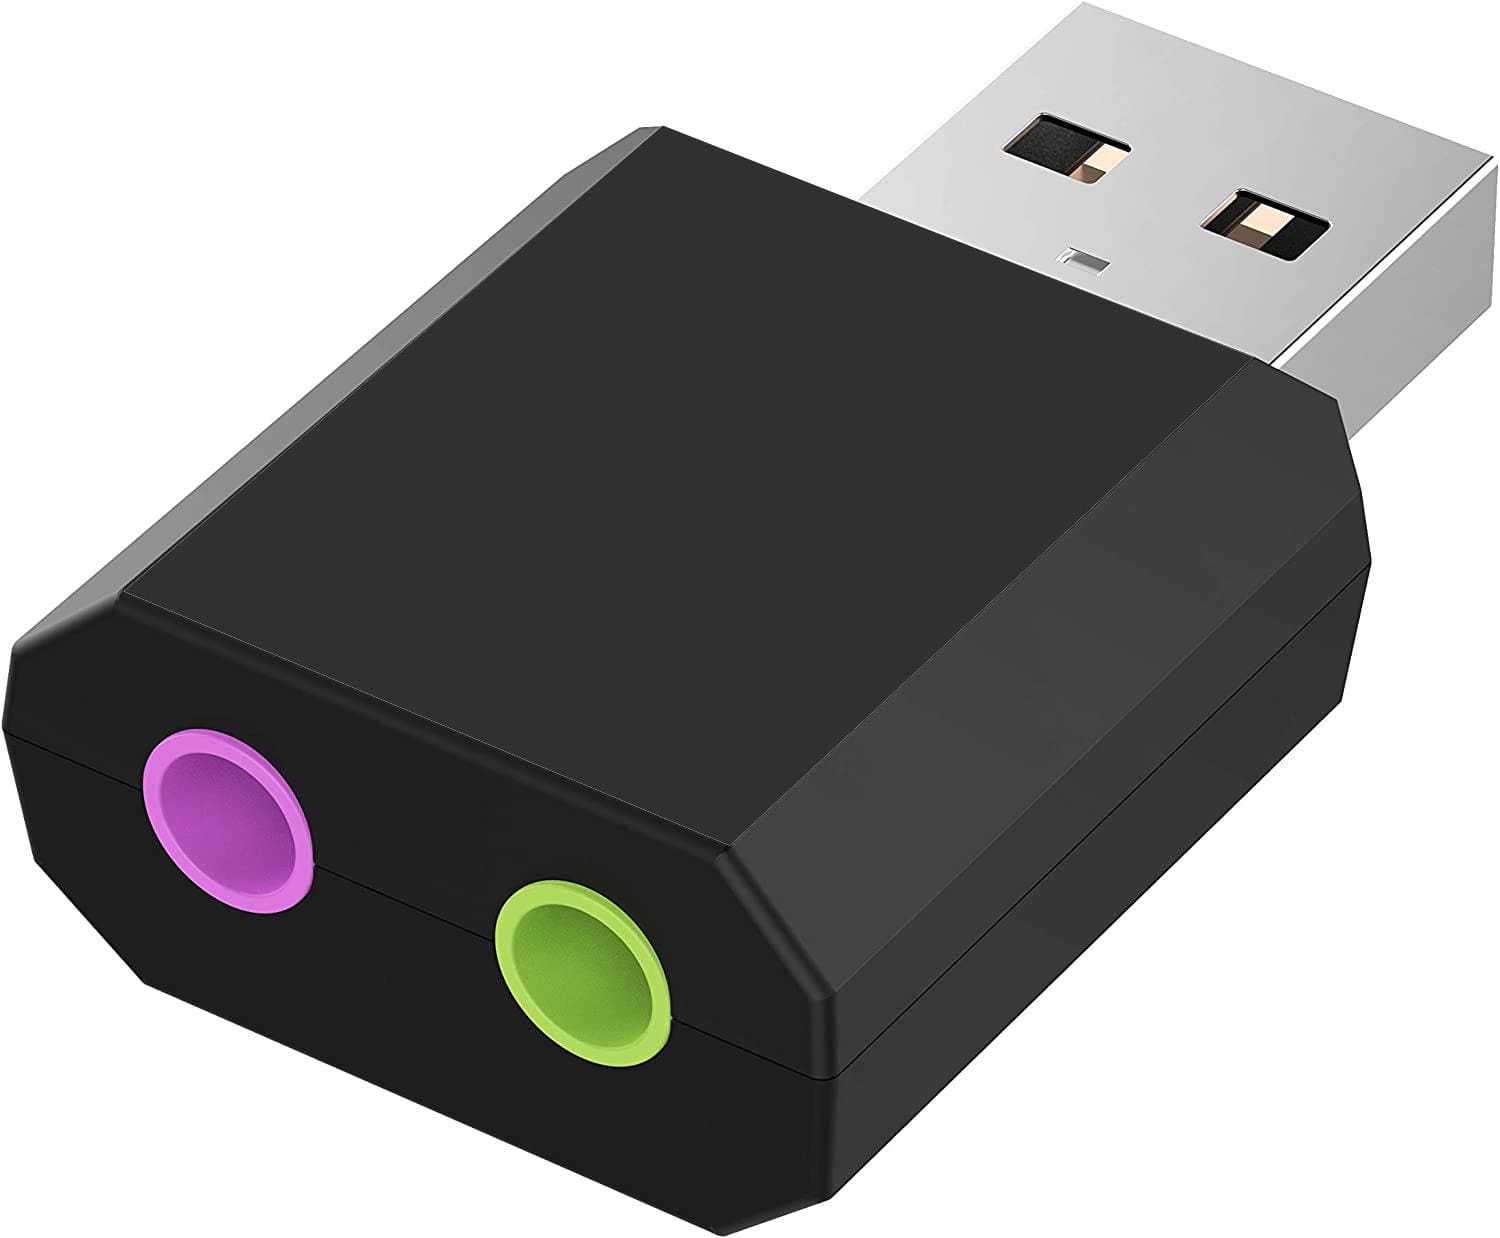
TeachLogic recommends a USB connection. USB simplifies cable management and most video conferencing applications automatically recognize a USB connection in their audio settings menu. We have seen success with this adapter.
After determining which splitter is needed, determine what additional cables are needed. See below for details.
STEP 1: Mark one of the audio cables at both ends with tape, a sticker, or a marker. (if you are connecting a VoiceLink I, mark the RCA-to-3.5 mm cable.)
STEP 2: See below based on your TeachLogic amplifier:
STEP 3: Pick up the unconnected ends of the cables and way to the computer.
STEP 4: If using an audio splitter, connect that the applicable port on the computer.
STEP 5: Connect the the marked audio cable to the computer’s mic/audio input (this is the pink port and/or the one marked with a microphone symbol).
STEP 6: Connect the second cable to the computer’s speaker output (this is the green port and/or the one marked with a speaker symbol).
STEP 7: Verify all cables are seated properly and nothing came loose.
STEP 8: On the amplifier, set the gain control knobs for the Input and Output to the 10′ o click position.
Each conference application and computer has its own settings. Settings may vary from application to application and computer to computer. Please refer to their respective user guides if you have trouble locating the settings.
This test will require a second person with another device to join the video conference.
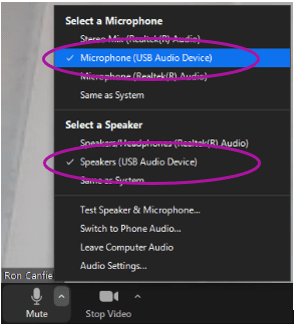
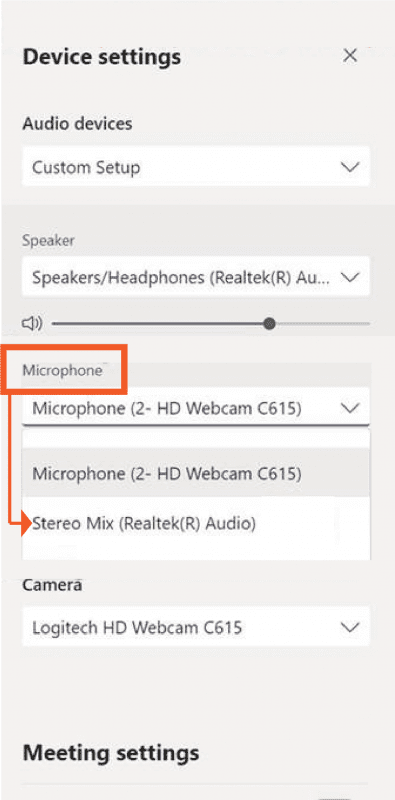
STEP 1: Launch your video conference application and start a meeting. When in the conference, change both the microphone and speaker setting.
For a USB splitter, choose the “USB Audio Device” setting.
When no splitter or a 3.5 mm splitter is used, the proper setting is usually the name of the sound card manufacturer. “(Realtek(R) Audio)” in the example shown.
This may differ from computer to computer, so please test another setting if the first one chosen does not work.
STEP 2: Set the computer’s volume to mid-scale (40-50%).
STEP 3: Invite the other person and have them leave the room. Turn on the TeachLogic microphone, place it at your collarbone (where it would naturally set) and begin speaking to the other person in the conference. They should hear you and you should hear them through the classroom speakers.
Be sure that the video conference “Mute” function is not active as that is sometimes the default setting at the start of a conference.
STEP 4: Verify that the person hears you through the TeachLogic microphone by muting the microphone (momentarily press the “TL” button to mute). If they can not longer hear you, the connection is successful.
For the Classroom
Because the computer, video conferencing, and other source like YouTube each have their own volume control, it is best to adjust those before the TeachLogic amplifier. Each should be set about mid-scale (40-50%) and adjusted from there to see if this resolves the issue. Locate the control dial adjacent to the output port you used on the TeachLogic amplifier/receiver. Turn the dial clockwise to increase the volume, counterclockwise to decrease. If you need additional adjustment, locate the microphone settings on your video recording application.
For Online Learners
If the classroom audio is ok, but the online audio is too quiet then adjust the amplifier’s audio Output. Locate the dial closest to where the audio cable is connected to the Output port.
Clockwise: increase the volume
Counterclockwise: decrease the volume
No Volume?
When no sound is heard, there are 2 main causes assuming a cable did not come loose.
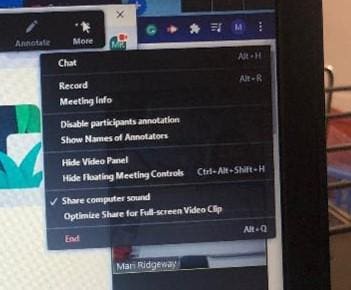
If remote learners cannot hear videos from playing on your computer, this might be due to a “sharing” setting in the video conferencing application. This has nothing to do with TeachLogic, but it is good to be aware of.
If all other audio sources are working except for a video playing on the computer, locate the main settings or “More” menu–often symbolized with 3 dots–and find the “Share computer sound” setting. This should solve the issue.
For a closer look, watch the how-to video below. To find out what system is best for your needs, contact us.
[printfriendly]
TeachLogic offers three different IR transmitter choices: our Sapphire Pendant microphone, a handheld microphone, and a wireless transmitter that enables mobile or stationary AV equipment like a TV to be wirelessly connected to the in-room TeachLogic audio system.
[printfriendly]
A handheld microphone can also be a powerful tool to help students gain confidence when presenting or reading aloud. Also, it is very helpful for students to hear their fellow classmates as they make their presentations.
[printfriendly]
A microphone that is being used regularly needs to be charged every night. When the microphone will not be used for an extended period of time–such as winter or summer break–then fully charge the battery and disconnect the charger from its power source. Recharge the battery upon your return.
[printfriendly]
The assisted listening device is patched with a cord from the mic jack or aux input on the transmitter to the mixer auxiliary output on the front of the TeachLogic classroom amplifier. All TeachLogic amplifiers have a gain control on the front panel next to the output to adjust the volume. This will then transmit the signal to the assistive listening device that the student is wearing or has on the desktop.
[printfriendly]
With the exception of the VoiceLink I, which has a single channel, each classroom audio system has two frequencies so that two microphones can be used simultaneously.
[printfriendly]
Not all classrooms are the same. We offer two ceiling speaker packages made for suspended acoustic ceiling and wall mounted speakers for hard ceilings.
TeachLogic offers several types of speakers to meet many different room sizes and acoustic needs. The room dimensions and ceiling height will determine which speaker will provide optimum performance.
TeachLogic offers several types of speakers to meet many different room sizes and acoustic needs. The room dimensions and ceiling height will determine which speaker will provide optimum performance.
The coverage for a TeachLogic Classroom Sound-Field System will depend upon speaker choice. Typically, a system covers 1500 to 2500 square feet.
For regular classroom use, many teachers prefer to use the Quantum II for infrared wireless transmission. This system uses the same Sapphire Pendant transmitter that is used with the infrared classroom sound-field systems. This unit will cover up to 1800 square feet and must be used indoors. This amplifier can be wall mounted, installed on a tripod stand or free standing on a shelf or cabinet.
Yes. Our handheld microphone uses AA rechargeable batteries while our pendant microphones (IRT-55 & IRT-60 models) use a rechargeable lithium polymer battery. For more info: https://teachlogic.com/product-category/components/batteries/
These batteries with proper care can last up to three years.
Yes, but these batteries CAN NOT be charged as charging them will cause damage that is not covered under warranty. TeachLogic battery chargers have built-in circuit protection that will not charge alkaline batteries.
With proper maintenance, a classroom sound-field system should last approximately 10+ years.
Yes. You can add an infrared microphone system to your RF system. This allows you to keep your existing amplifier and speakers and add only the IR wireless microphone component. VoiceLink I is a single channel IR system.
We have a Full Line Catalog available for download. The link can be found at the bottom of the home page. Individual product brochures available in the download section of the individual product.
The system comes with a user manual, but the local TeachLogic integrator in your area may be available for in-service training.
[printfriendly]
Please contact us so we can help get you the help you need.
Sometimes a single system is used to support two rooms. However, at times it may be desirable that the speakers in the second room are switched off so the sound does not play in that room. The best way to accomplish this would be with a 3rd party speaker switch such as the one seen here. It is wired inline between the TeachLogic amplifier and the speakers.
[printfriendly]
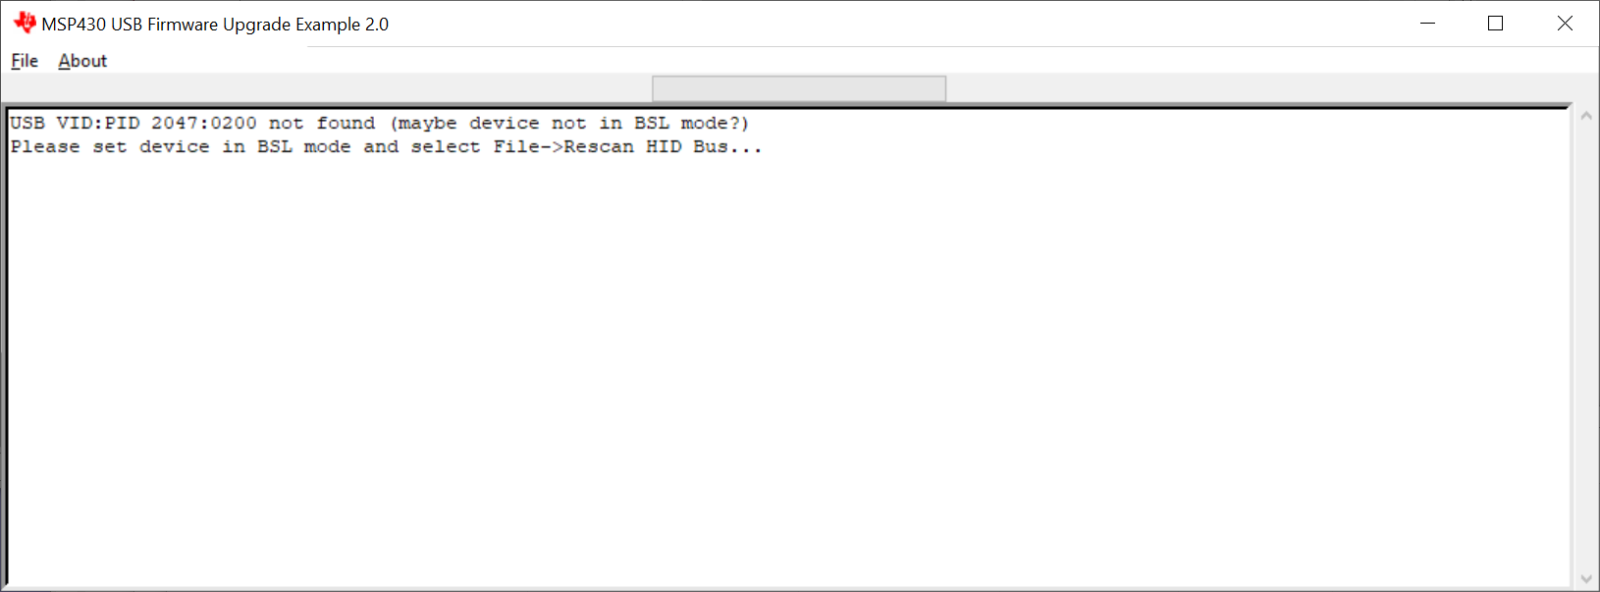
The updated firmware (ver 2.12 or 3.5) adds a feature to put the IMA-120 amplifier in a low power Standby mode when not in use. This helps ensure long product life and reduce power consumption.
After 2 hours of no audio activity on amplifier inputs (wireless mics and auxiliary audio inputs), the amplifier will go into low-power Standby mode.
It can also be manually placed in Standby with two short presses of the power button.
LED COLOR INDICATORS
WAKING UP FROM STANDBY
An audio signal from either wireless microphone or Aux1 or Aux2 inputs will cause the amplifier to go from Standby to ON mode. So the simplest action for an end user is to power on a microphone, and speak into it. It takes a few seconds to power up the amplifier section and amplify inputs.
This is a critical update for units with FW versions beginning in 2.X that have never been upgraded. Without it, the amplifier may fail prior to its designed lifespan.
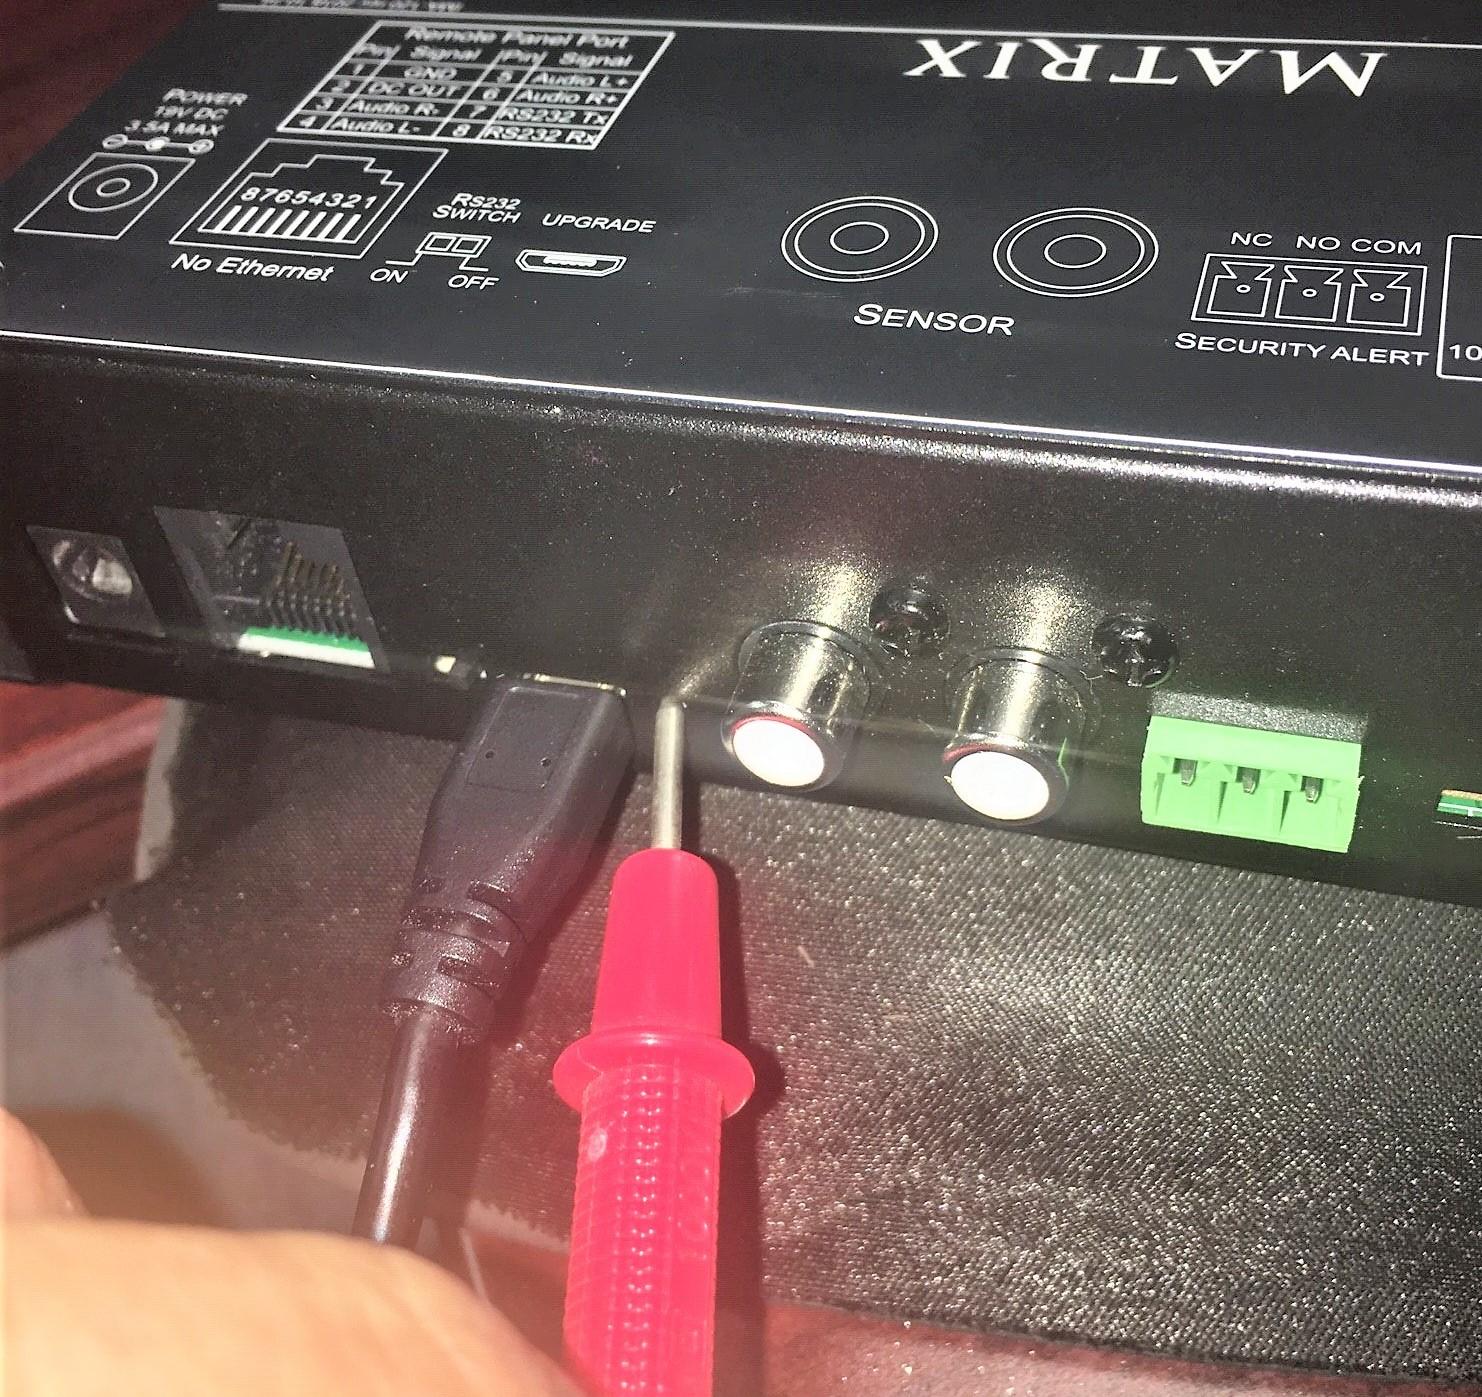
ITEMS NEEDED
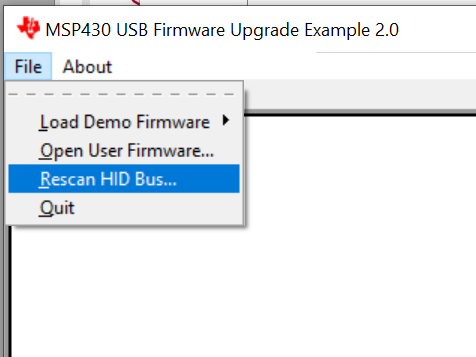
CHOOSE YOUR FIRMWARE
Choose your file based on whether you want the amplifier to mute only, or pass through the page to the classroom speakers. Choose file 3.5CPP or 3.5CPM if your current firmware version starts with 3.X. Choose file 2.12PP or 2.12PM if your current version starts with 2.X. The standard version is either 2.12PP or 3.5CPP. Choose this if you are unsure which version you have now.
After you click Download, a web page will open. Right click with your mouse and Save As a .TXT file in location where you can easily “Open” the file for the steps below.
2.12PP has “Page Pass Through” and “Page Mute” meaning that audio signal on Page input terminal is played over speakers when amplifier is powered on. Other audio inputs are muted and not played on speakers. For use on units with current firmware version 2.X. Click here: Download 2.12PP
2.12PM has Page Muting, but no Page Pass Through. The paging audio is not played on speakers, but all audio is muted when page signal is present. For use on units with current firmware version 2.X. Click here: Download 2.12PM
3.5CPP has “Page Pass Through” and “Page Mute” meaning that audio signal on Page input terminal is played over speakers when amplifier is powered on. Other audio inputs are muted and not played on speakers. For use on units with current firmware version 3.X. Click here: Download 3.5CPP
3.5CPM has Page Muting, but no Page Pass Through. The paging audio is not played on speakers, but all audio is muted when page signal is present. For use on units with current firmware version 3.X. Click here: Download 3.5CPM
WARNING
PREPARATION
Have your computer on and ready with the download files. Place the the amplifer(s) within reach. And have the USB cable and small tool.
UPDATE PROCEDURE
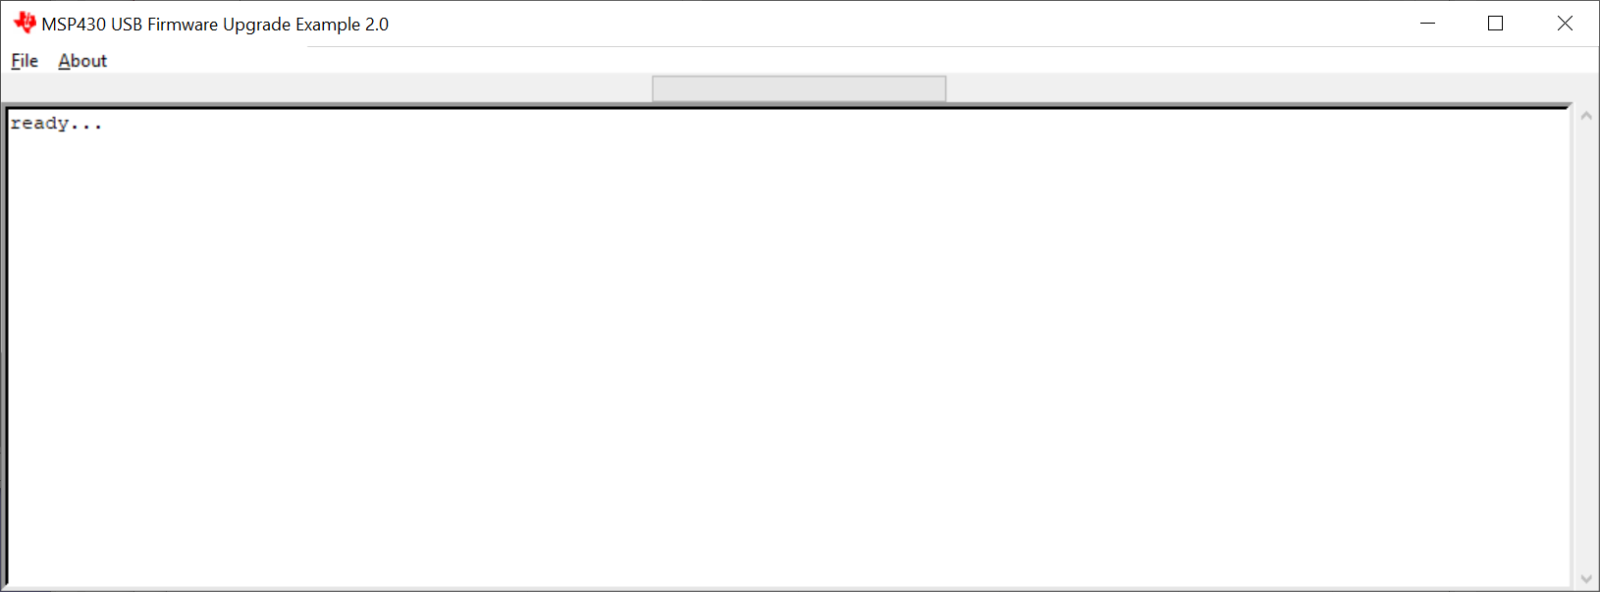
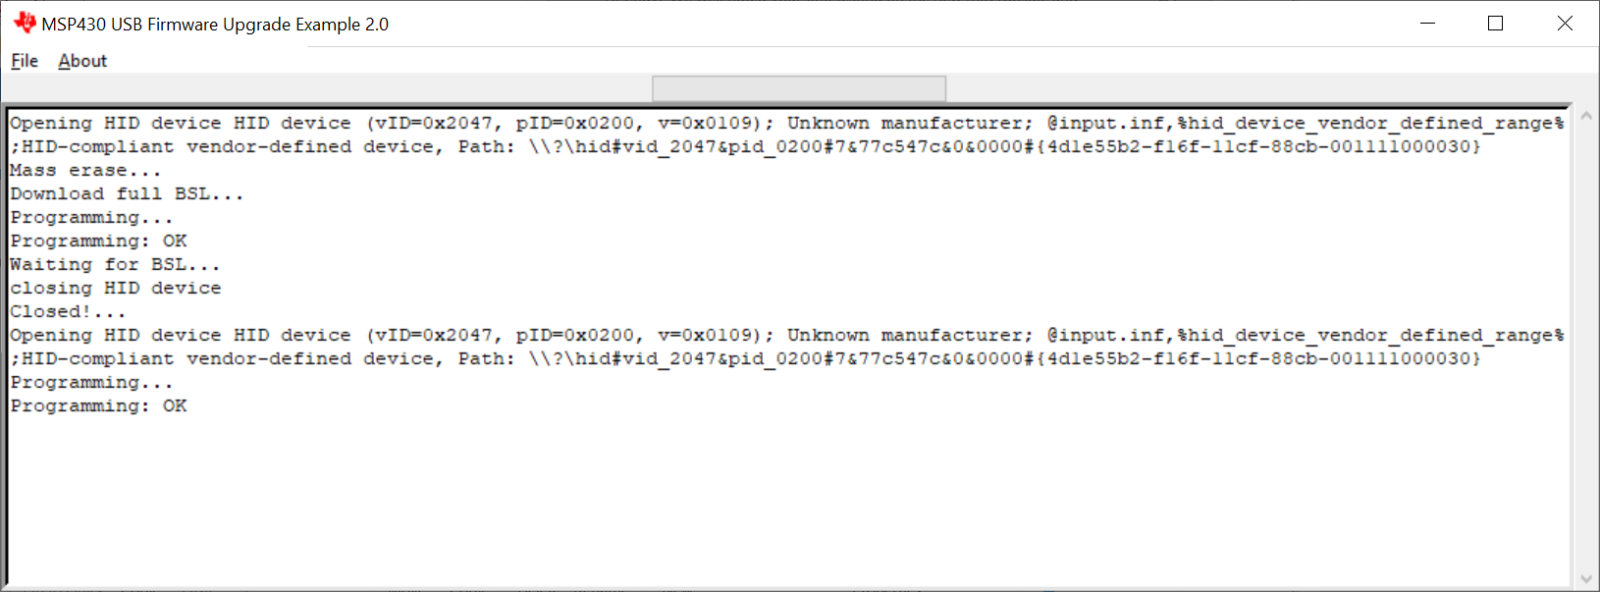
If you encounter any issues, you will need to repeat this process taking care to follow each step exactly.
[printfriendly]
This is how to use two microphones in a large/split room where each side has it’s own amplifier w/ ceiling sensor. This will avoid each room broadcasting the other’s transmission.
WHEN USING THE IRT-60 SAPPHIRE PENDANT MICROPHONE IN EACH ROOM
Step 1: Designate one room for Channel A (room A), and one for Channel B (room B)
Step 2: In room B, change the channel on the IRT-60 Sapphire microphone from A to B. Watch this quick video to see how: https://www.youtube.com/watch?v=01TKGX1ByZo.
Note that the back cover is sometimes difficult to remove.
Step 3: On the opposite channel in each room, turn the mic channel gain all the way down.
WHEN USING THE IRH-35 HANDHELD MICROPHONE IN EACH ROOM
If using an IRH-35 handheld microphone, please note that it comes set on channel B. Therefore, you’ll need to change the other microphone to channel A (for room A).
Step 1: Unscrew the handle
Step 2: Remove the batteries and locate the channel selector.
Step 3: Change the mic for room A to channel A.
Advisory: If you are using both the IRT-60 and IRH-35 in each room, only one mic can be used at a time to avoid interference. Therefore if the handheld microphone is used, the Sapphire will need to be muted and vice versa.
[printfriendly]
Yes! These are the instructions to connect an already installed TeachLogic classroom audio system to a computer hosting a video conferencing application to synchronize classroom audio for online listeners. Using a TeachLogic wireless microphone allows the teacher to move freely around the room without affecting audio quality for the students.
All media devices connected to the TeachLogic amplifier (including microphones) will be heard by online viewers.
All audio—including devices connected directly to the computer—will play through the TeachLogic amplifier/receiver in the classroom.
TeachLogic recommends a USB connection. USB simplifies cable management and most video conferencing applications automatically recognize a USB connection in their audio settings menu. We have seen success with this adapter.
After determining which splitter is needed, determine what additional cables are needed. See below for details.
STEP 1: Mark one of the audio cables at both ends with tape, a sticker, or a marker. (if you are connecting a VoiceLink I, mark the RCA-to-3.5 mm cable.)
STEP 2: See below based on your TeachLogic amplifier:
STEP 3: Pick up the unconnected ends of the cables and way to the computer.
STEP 4: If using an audio splitter, connect that the applicable port on the computer.
STEP 5: Connect the the marked audio cable to the computer’s mic/audio input (this is the pink port and/or the one marked with a microphone symbol).
STEP 6: Connect the second cable to the computer’s speaker output (this is the green port and/or the one marked with a speaker symbol).
STEP 7: Verify all cables are seated properly and nothing came loose.
STEP 8: On the amplifier, set the gain control knobs for the Input and Output to the 10′ o click position.
Each conference application and computer has its own settings. Settings may vary from application to application and computer to computer. Please refer to their respective user guides if you have trouble locating the settings.
This test will require a second person with another device to join the video conference.
STEP 1: Launch your video conference application and start a meeting. When in the conference, change both the microphone and speaker setting.
For a USB splitter, choose the “USB Audio Device” setting.
When no splitter or a 3.5 mm splitter is used, the proper setting is usually the name of the sound card manufacturer. “(Realtek(R) Audio)” in the example shown.
This may differ from computer to computer, so please test another setting if the first one chosen does not work.
STEP 2: Set the computer’s volume to mid-scale (40-50%).
STEP 3: Invite the other person and have them leave the room. Turn on the TeachLogic microphone, place it at your collarbone (where it would naturally set) and begin speaking to the other person in the conference. They should hear you and you should hear them through the classroom speakers.
Be sure that the video conference “Mute” function is not active as that is sometimes the default setting at the start of a conference.
STEP 4: Verify that the person hears you through the TeachLogic microphone by muting the microphone (momentarily press the “TL” button to mute). If they can not longer hear you, the connection is successful.
For the Classroom
Because the computer, video conferencing, and other source like YouTube each have their own volume control, it is best to adjust those before the TeachLogic amplifier. Each should be set about mid-scale (40-50%) and adjusted from there to see if this resolves the issue. Locate the control dial adjacent to the output port you used on the TeachLogic amplifier/receiver. Turn the dial clockwise to increase the volume, counterclockwise to decrease. If you need additional adjustment, locate the microphone settings on your video recording application.
For Online Learners
If the classroom audio is ok, but the online audio is too quiet then adjust the amplifier’s audio Output. Locate the dial closest to where the audio cable is connected to the Output port.
Clockwise: increase the volume
Counterclockwise: decrease the volume
No Volume?
When no sound is heard, there are 2 main causes assuming a cable did not come loose.
If remote learners cannot hear videos from playing on your computer, this might be due to a “sharing” setting in the video conferencing application. This has nothing to do with TeachLogic, but it is good to be aware of.
If all other audio sources are working except for a video playing on the computer, locate the main settings or “More” menu–often symbolized with 3 dots–and find the “Share computer sound” setting. This should solve the issue.
For a closer look, watch the how-to video below. To find out what system is best for your needs, contact us.
[printfriendly]
Summary: For integrators comfortable doing so, you may connect both the fire alarm relay and an intercom/paging IP module relay to the FA Mute Input. The input is a dry contact closure in the normally open position. The amplifier looks for this circuit to close. Any “short” or “closure” of the circuit will mute the amplifier.
Compatibility: TeachLogic Maxim™ and Spectrum™ amplifiers
Disclaimer: We recommend consulting both the fire and paging system specs and instructions to ensure compatibility. We cannot guarantee function, so we recommend repeated testing. Also, we cannot advise whether this will void the other systems’ warranty, service agreement, or another binding document.
Integration: Wire the fire alarm and IP module in series/parallel. This allows either/both to close the circuit.
Download a copy of this document:
[printfriendly]
“TL” button indicator lights:
No Light: Power is OFF
Solid Blue: Power is ON; 50-100% of battery life
Solid Purple: 25-50% of battery life
Solid Red when using: 0-25% battery life
Blinking Blue: Mic is muted
Solid Red when charging: Charging in progress
Solid Green when charging: Battery is fully charged
Blinking Red: Battery needs to be replaced
Yellow: Mic has entered “test mode”; need to remove battery and reconnect it
[printfriendly]
The two main causes of a persistent humming or buzzing are:
When audio cables are damaged, they either lose their grounding efficacy or no longer seat properly in the plug. This poor connection creates a low frequency hum and/or buzzing.
It has also been observed that insufficient electrical grounding in buildings can easily travel through audio cables and into an amplifier thereby creating a low frequency hum and/or buzzing.
Bad cables need to be replaced whereas the electrical noise issue might simply require turning down the volume on the amplifier input where the noisy cable is connected.
Troubleshooting:
Step 1: Visually inspect the audio cables for visible damage and ensure they are seated properly. If the noise changes in any way while touching a cable—such as a crackle, pop, or rustling sound—then the cable is likely bad. Unplug that cable to see if the noise goes away. If it does, then you need to replace the audio cable.
Step 2: If there is no visible damage, then unplug each cable one at a time. If the noise goes away, the replace that cable.
Step 3: If the new cable does not solve the issue, then check the volume of the audio source. We have observed grounding issues in classrooms and the noise is simply an amplification of the ground noise.
If a wall control panel is being used, see below. Otherwise, observe what input on the amplifier the cable is connected to and adjust the corresponding volume knob up and down to see if this alters the volume of the noise. If it does, then you need to keep the volume set to a level where noise is no longer audible.
Wall Control Panel: On the wall panel, adjust the volume for the corresponding input where the cable is connected to see if this changes the volume of the buzzing. If it does, then you need to keep the volume set to a level where noise is no longer audible.
Note: you may also adjust the volume on the audio device (such as a laptop), to see if this alters the volume of the buzzing. If it does, then you need to keep the volume set to a level where noise is no longer audible.
[printfriendly]
When a Page signal is detected and the amplifier is muted, the page plays through the classroom loudspeakers, but not the ALS or Lesson Capture outputs.
[printfriendly]
With the exception of one balanced input on our VoiceLink I pre-amp, all of our amplifier inputs & outputs are monophonic unbalanced TS connections.
[printfriendly]
If your amplifier is equipped with an RS-232 input (for connecting a wall mounted control panel), there is also an ON/OFF switch for this feature. When switched to the ON position, the amplifier disables the volume/gain controls on the amplifier. If you do not need to use the RS-232 input, then ensure the switch is in the OFF position to enable the function of the control knobs.
If the problem persists, call the TeachLogic service department to further trouble shoot the problem. If the technician determines that the product needs to be returned for service, the technician will issue a return authorization number (RA#) to track the repair. Repair by other than TeachLogic or its authorized service agencies will void the warranty.
RA stands for Return Authorization. This number is used to track items that have been returned for repair.
Yes in many instances. Please check our Repairs/Returns page for helpful tips or to contact TeachLogic to determine the most cost effective course of action.
You may return the equipment within 30 days of the invoice and receive a full refund of the purchase price. After 30 days, there is a minimum 20% restocking fee.
You may exchange a microphone of equal price within the first 30 days at no extra charge.
Often, the volume of the classroom sound field system is turned up too high. The volume should be at a level that is heard will by the students and not necessarily the teacher.
The only precautions that are necessary are to fully charge the batteries, and then make sure the battery charger and amplifier are unplugged from the power source.
Contact the TeachLogic installation company in your area, on-site service may be purchased from that provider.
No. The warranty does not cover damages that are not defects from manufacturing.
The product warranty is on this website under Warranty (click here).