Can a TeachLogic microphone be used with video conferencing apps for Distance Learning?
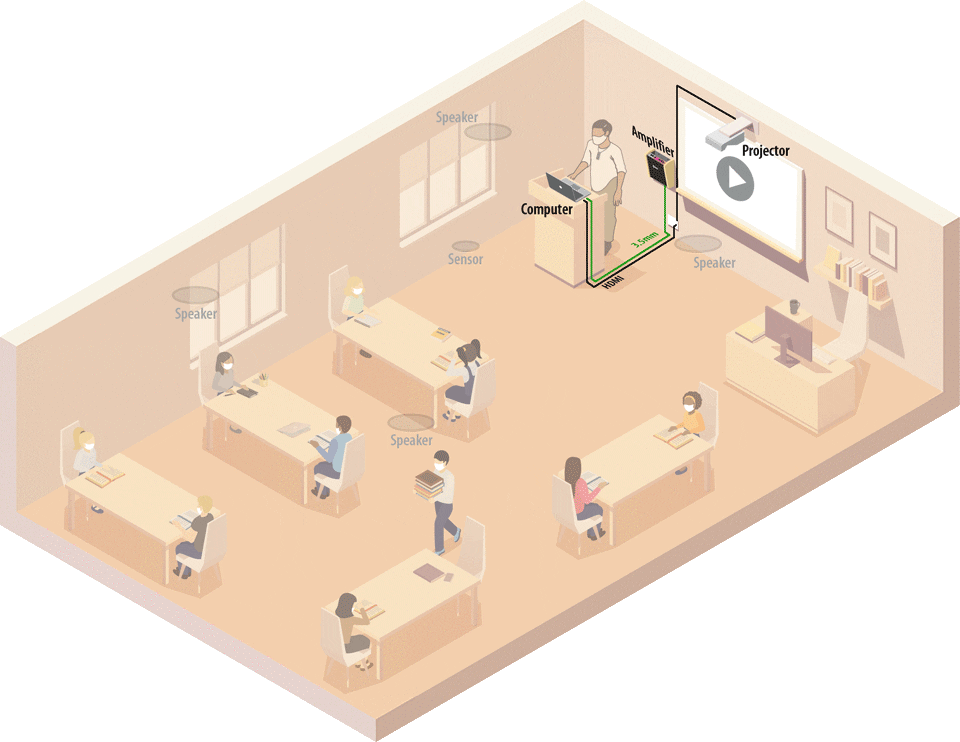
Yes! Below are the instructions to connect an already installed TeachLogic classroom audio system to a computer hosting a video conferencing application. to include classroom audio for online listeners. Using a TeachLogic wireless microphone allows the teacher to move freely around the room without affecting the audio quality.
Compatible TeachLogic Systems
Forum™
Maxim™
Spectrum™
Matrix™
Quantum™ II
VoiceLink™ I (requires existing classroom audio system)
Can a TeachLogic microphone be used with video conferencing apps for Distance Learning?
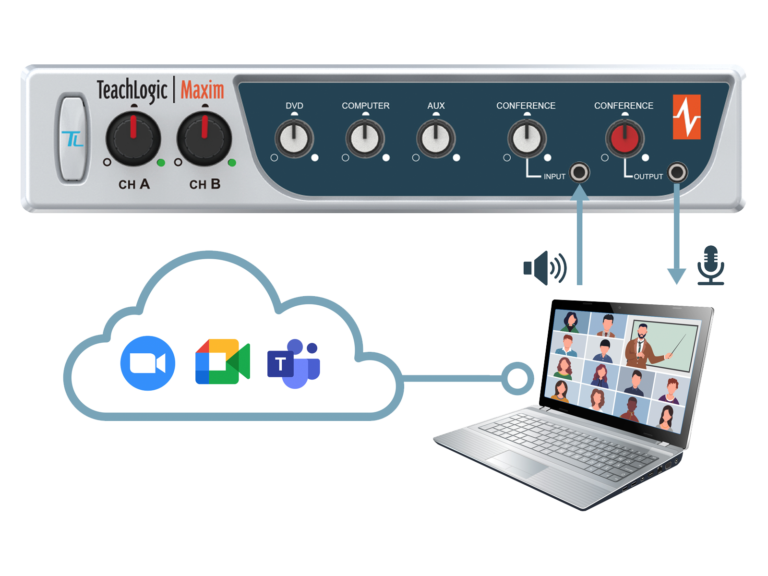
All media devices connected to the TeachLogic amplifier (including microphones) will be heard by online viewers. All audio—including devices connected directly to the computer—will play through the TeachLogic amplifier/receiver in the classroom.
Amplifier Output > Computer Input: enables online learners to hear classroom audio including wireless microphones.
The placement of the computer should be based on what you want to be visible on camera. Please note that moving any device might affect what cables are required to maintain the connection.
Take care to measure the distance between the computer and the TeachLogic amplifier to ensure your audio cables will be long enough.
Locate the computer audio connections. Determine if there are separate connections for an audio input & audio output or a single port.
If there is a single port, an audio “splitter” that supports both a microphone and speaker connection will be required. See the next sections for details on how to identify what cables you will need and for help identifying your computer’s audio connections.
Computer Audio Connections
Separate 3.5 mm input & output: The microphone/audio input on most computers is a 3.5 mm port. It is often identified by a pink circle with a microphone icon, whereas the audio output is identified by a green circle with a headphone icon.
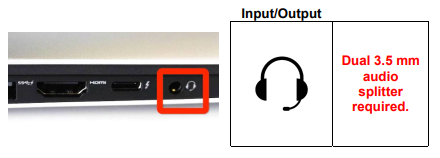
Single 3.5 mm connection: This often is black or silver and is represented by the “headset” symbol.
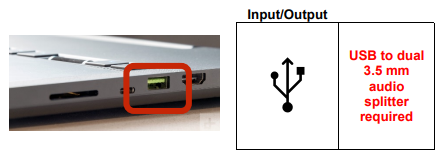
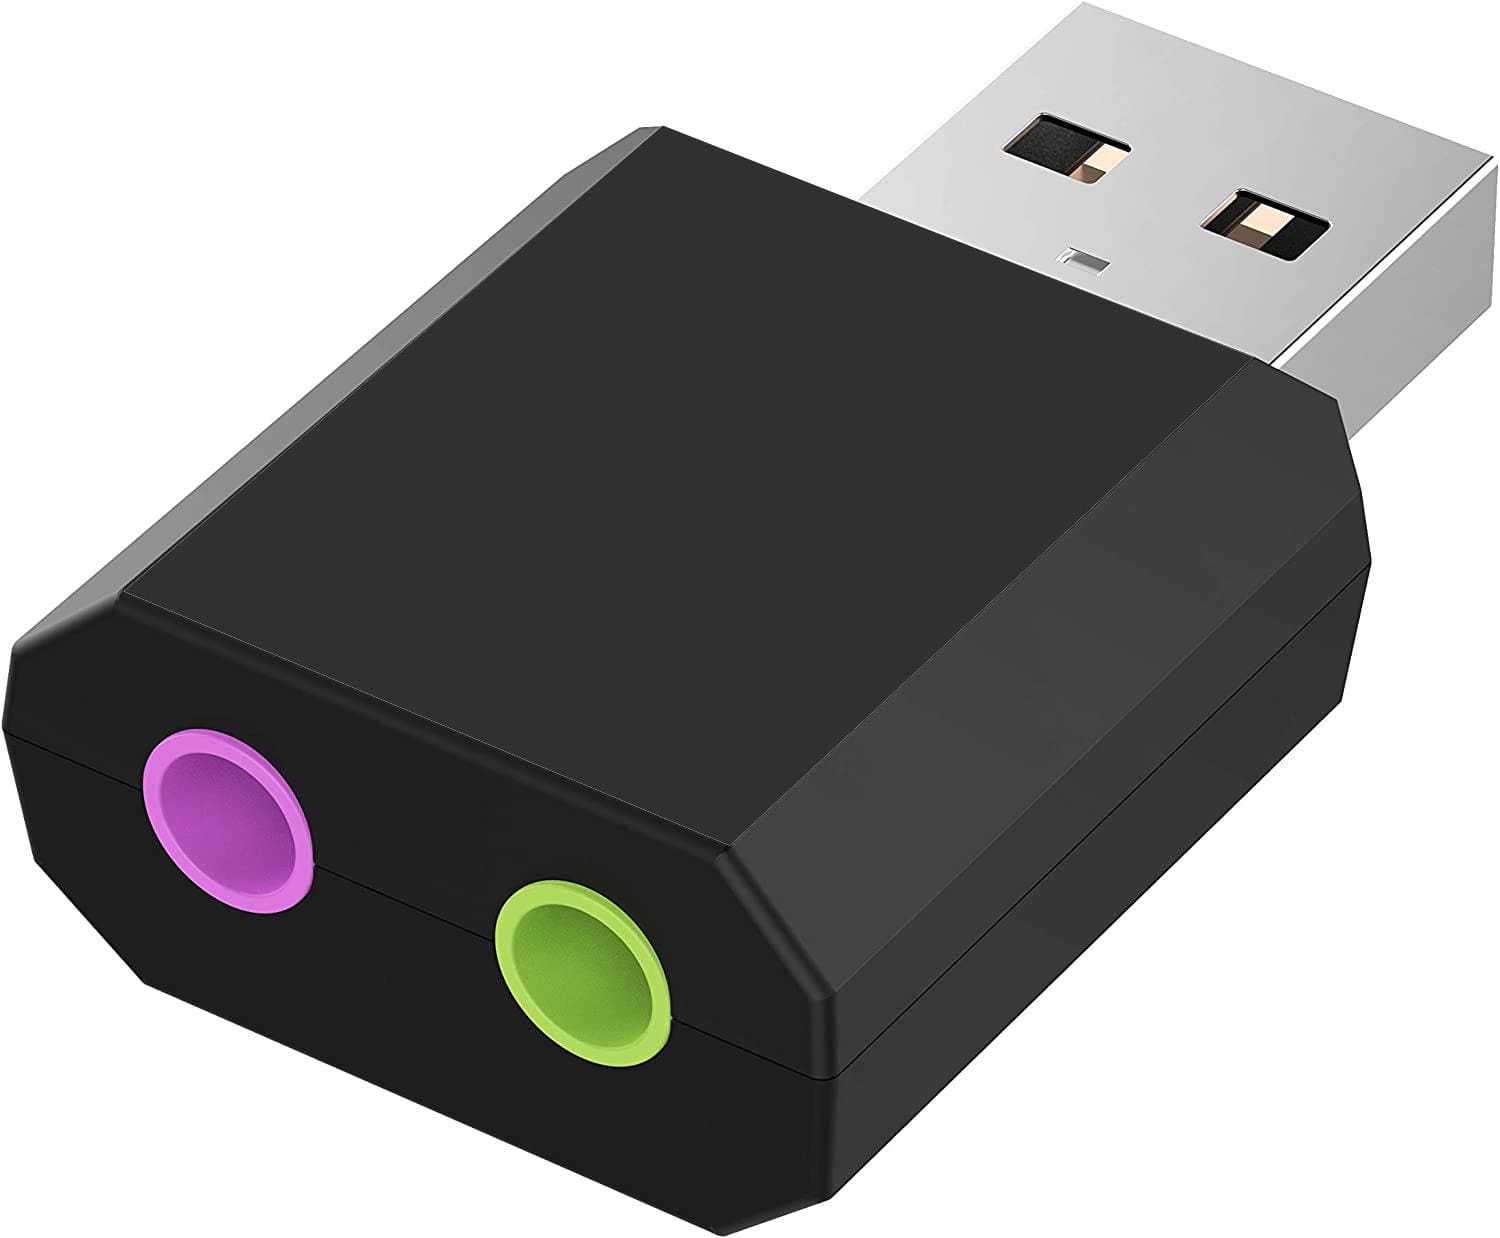
USB connection: If the computer does not have 3.5 mm connections, connect to the computer’s USB port using a USB-to-3.5 mm splitter.
TeachLogic recommends a USB connection. USB simplifies cable management and most video conferencing applications automatically recognize a USB connection in their audio settings menu. We have seen success with this adapter.
Audio Cable Requirements
After determining which splitter is needed, determine what additional cables are needed. See below for details.
Maxim, Spectrum, Forum, Matrix, Quantum II
2 x 3.5 mm-to-3.5 mm audio cables
VoiceLink I
1 x male RCA-to-3.5 mm audio cable
1 x 3.5 mm-to-3.5 mm audio cable
Connecting The System
STEP 1: Mark one of the audio cables at both ends with tape, a sticker, or a marker. (If you are connecting a VoiceLink I, mark the RCA-to-3.5 mm cable.) This should connect to the computer’s input and amplifier output.
STEP 2: See below based on your TeachLogic amplifier:
Maxim, Spectrum, Forum
Connect the marked 3.5 mm audio cable to an Output port on the front of the TeachLogic amplifier.
Connect the other 3.5 mm audio cable to an Input port on the front of the TeachLogic amplifier.
Go to STEP 3.
Matrix, Quantum II
Connect the marked 3.5 mm audio cable to a Line Out port on the TeachLogic amplifier.
Connect the other 3.5 mm audio cable to an Input port on the TeachLogic amplifier.
Go to STEP 3.
VoiceLink I
Connect the RCA end of the RCA-to-3.5 mm cable to the Line Out port on the back of the VoiceLink I.
Connect the other 3.5 mm audio cable to the Input port on the front of the VoiceLink I.
STEP 3: Pick up the unconnected ends of the cables and walk to the computer.
STEP 4: If using an audio splitter, connect the applicable port on the computer.
STEP 5: Connect the marked audio cable to the computer’s mic/audio input (this is the pink port and/or the one marked with a microphone symbol).
STEP 6: Connect the second cable to the computer’s speaker output (this is the green port and/or the one marked with a speaker symbol).
STEP 7: On the amplifier, set the gain on the Input and Output control knobs to the 12 o’clock position.
STEP 8: Verify all cables are seated properly and that nothing is loose.
Testing The Conference Audio
Each conference application and each computer has their own settings. Settings may vary from application to application and from computer to computer. Please refer to their user guides if you have trouble locating the settings.
This test will require a second person with another device to join the video conference.
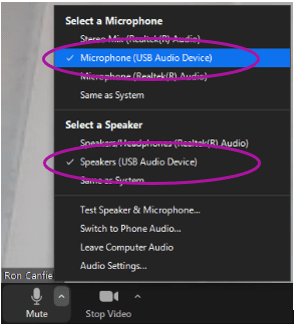
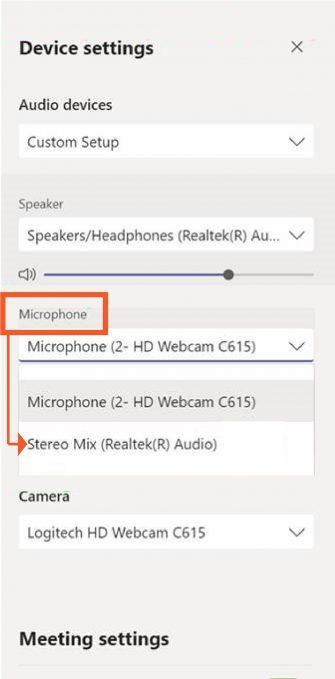
STEP 1: Launch your video conference application and start a meeting. When in the conference, change both the microphone and speaker setting.
For a USB splitter, choose the “USB Audio Device” setting.
When no splitter or a 3.5 mm splitter is used, the proper setting is usually the name of the sound card manufacturer. “(Realtek(R) Audio)” is in the example shown.
This may differ from computer to computer, so please test another setting if the first one chosen does not work.
STEP 2: Set the computer’s volume to mid-scale (40-50%).
STEP 3: Invite another person and have them leave the room. Turn on the TeachLogic microphone, place it at your collarbone (where it would naturally sit), and begin speaking to the other person in the conference. They should hear you and you should hear them through the classroom speakers.
Be sure that the video conference “Mute” function is not active as that is sometimes the default setting at the start of a conference.
STEP 4: Verify that the person hears you through the TeachLogic microphone by muting the microphone (momentarily press the “TL” button). If they can no longer hear you, the connection is successful.
Adjusting the Volume
Amplifier microphone channel: Adjusts the microphone volume both in class and on Zoom (or other application)
Amplifier audio Output: Adjusts the volume of the computer audio heard by students online
Amplifier audio Input: Adjusts the volume of everything coming from the computer into the classroom
For the Classroom
Because computer, video conferencing, and applications like YouTube each have their own volume control, it is best to adjust those before adjusting the TeachLogic amplifier. Each should be set about mid-scale (40-50%) and adjusted to see if this resolves the issue. Locate the control dial adjacent to the output port you used on the TeachLogic amplifier/receiver. Turn the dial clockwise to increase the volume, and counterclockwise to decrease. If you need additional adjustments, locate the microphone settings on your video recording application.
For Online Learners
If the classroom audio is ok, but the online audio is too quiet then adjust the amplifier’s audio Output. Locate the dial closest to where the audio cable is connected to the Output port.
Clockwise: increase the volume
Counterclockwise: decrease the volume
No Volume?
When no sound is heard, there are 2 main causes assuming a cable did not come loose.
A volume setting on the computer or application is too low, or a mute function was pressed. Check these settings first.
The computer’s audio settings do not match the video conference sound settings. Locate your computer’s sound settings and ensure the microphone and speaker settings are correct.
A Note About Online Video Players Like YouTube
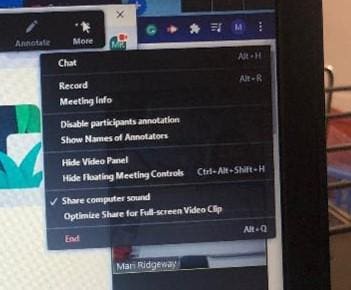
If remote learners cannot hear videos playing on your computer, this might be due to a “sharing” setting in the video conferencing application. This has nothing to do with TeachLogic, but it is good to be aware of.
If all other audio sources are working except for a video playing on the computer, locate the main settings or “More” menu–often symbolized with 3 dots–and choose the “Share computer sound” setting. This should solve the issue.
We use cookies to ensure that we give you the best experience on our website. If you continue to use this site we will assume that you are happy with it.